Serial Communication between arduino and bluetooth module
Introduction
In the world of embedded systems and IoT (Internet of Things), wireless communication is a cornerstone. Among the various wireless communication protocols, Bluetooth stands out due to its simplicity, low power consumption, and ease of use. This blog explores the integration of Bluetooth modules with Arduino, focusing on serial communication—a fundamental aspect for enabling Arduino to communicate wirelessly with other devices.
Understanding Serial Communication
Serial communication is a method of transmitting data one bit at a time, sequentially, over a communication channel or computer bus. It is one of the most common forms of communication between computers and peripherals.
Key Concepts of Serial Communication
Baud Rate: The speed of data transmission, measured in bits per second (bps). Common baud rates include 9600, 19200, 38400, 57600, and 115200.
TX and RX: TX (transmit) and RX (receive) are the pins used for serial communication. Data sent from the TX pin of one device should be received by the RX pin of the other device.
Start and Stop Bits: These bits mark the beginning and end of a data packet, ensuring the data is correctly framed.
Parity Bit: An optional error-checking mechanism.
Bluetooth Communication
Bluetooth is a wireless technology standard used for exchanging data over short distances. It operates in the 2.4 GHz ISM band and employs frequency-hopping spread spectrum technology to reduce interference.
Bluetooth Modules for Arduino
Several Bluetooth modules are compatible with Arduino, the most popular being the HC-05 and HC-06. These modules can be used in both Master and Slave configurations. HC-05 can be configured as either, while HC-06 is typically used as a slave.
Setting Up the Bluetooth Module with Arduino
To demonstrate serial communication between an Arduino and a Bluetooth module, we'll use an HC-05 module. The process involves hardware connections, software setup, and coding.
Required Components
Arduino Uno (or any other compatible board)
HC-05 Bluetooth module
Jumper wires
Breadboard (optional)
Power source (USB cable or battery)
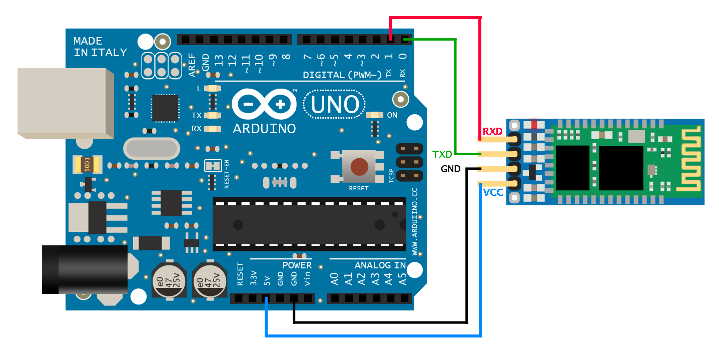
Hardware Connections
VCC: Connects to the 5V pin on the Arduino.
GND: Connects to the GND pin on the Arduino.
TXD: Connects to the RX pin on the Arduino (pin 0).
RXD: Connects to the TX pin on the Arduino (pin 1).
KEY/EN: (Optional) Used to enter AT command mode.
It's important to note that the RXD pin on the Bluetooth module is designed for 3.3V logic. Therefore, a voltage divider might be necessary to reduce the 5V signal from the Arduino to 3.3V.
Software Setup
Arduino IDE: Ensure you have the latest version of the Arduino IDE installed.
Serial Monitor: The Serial Monitor in the Arduino IDE will be used to send and receive data.
Coding the Arduino
We'll write a simple sketch to establish serial communication between the Arduino and the Bluetooth module. The sketch will send data from the Arduino to the Bluetooth module and vice versa.
char t;
void setup() {
Serial.begin(9600);
}
void loop() {
if(Serial.available()){
t = Serial.read();
Serial.println(t);
}
}
Circuit Diagram
Testing the Setup
Upload the Sketch: Upload the above sketch to the Arduino.
Pair the Bluetooth Module: Use a Bluetooth-enabled device (e.g., smartphone, computer) to pair with the HC-05 module. The default pairing code is usually "1234" or "0000".
Open a Serial Terminal: On your Bluetooth device, open a serial terminal app (such as Serial Bluetooth Terminal for Android or Tera Term for Windows).
Send and Receive Data: Use the serial terminal to send data to the Arduino, which will echo it back, confirming successful communication.
Advanced Configuration with AT Commands
AT commands are used to configure Bluetooth modules. They allow you to change settings such as the device name, baud rate, and mode (master/slave).
Entering AT Command Mode
To enter AT command mode, connect the KEY/EN pin to 3.3V and power cycle the module. The module's LED will blink slowly, indicating it is in AT mode.
Common AT Commands
Check Connection: AT (response should be OK)
Change Name: AT+NAME=YourDeviceName
Change Baud Rate: AT+UART=115200,0,0
Set Master Mode: AT+ROLE=1
Set Slave Mode: AT+ROLE=0
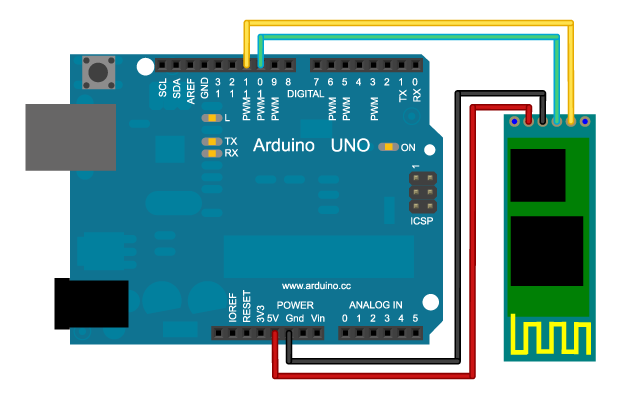
Use the following sketch to send AT commands to the Bluetooth module:
#include <SoftwareSerial.h>
// Create a SoftwareSerial object
SoftwareSerial BTSerial(10, 11); // RX, TX
void setup() {
// Start the hardware serial communication
Serial.begin(9600);
// Start the software serial communication
BTSerial.begin(38400); // Default baud rate for AT mode is 38400
Serial.println("Enter AT commands:");
}
void loop() {
// Read data from the Serial Monitor and send it to the Bluetooth module
if (Serial.available()) {
String command = Serial.readStringUntil('\n');
BTSerial.println(command);
}
// Read data from the Bluetooth module and send it to the Serial Monitor
if (BTSerial.available()) {
String response = BTSerial.readStringUntil('\n');
Serial.println(response);
}
}
Circuit diagram
Practical Applications
Serial communication between an Arduino and a Bluetooth module opens up numerous practical applications:
Remote Control: Control robots, drones, or other devices wirelessly.
Data Logging: Collect sensor data remotely and transmit it to a central system.
Home Automation: Implement smart home systems, allowing control of lights, thermostats, and appliances via Bluetooth.
Wearable Devices: Communicate with fitness trackers, smartwatches, and other wearable electronics.
Troubleshooting Tips
Check Connections: Ensure all connections are secure and correctly aligned.
Baud Rate: Ensure the baud rate for serial communication matches the settings on both the Arduino and Bluetooth module.
Voltage Levels: Use a voltage divider for the RXD pin on the Bluetooth module to avoid damage.
Module State: Confirm the module is in the correct mode (AT mode vs. communication mode) based on the LED blinking pattern.
Conclusion
Integrating a Bluetooth module with an Arduino for serial communication is a powerful way to add wireless capabilities to your projects. By understanding the basics of serial communication, setting up the hardware correctly, and writing efficient code, you can create a wide range of applications that leverage the versatility of Bluetooth technology. Whether for remote control, data logging, or home automation, the possibilities are vast and exciting.
Comments
Post a Comment